August, 2007
Builder progress updates:
Summer 2007 visits with
Gary Rene & Dave Melby
We have just returned from a great two-month
long summer vacation up north, where we
attended reunions and tried to find cooler
temperatures than Arizona, sometimes in vain. It
was often hotter where we were than back home
in Tucson! It was great to get away though.
While vacationing, I was fortunate to be able
to take some time out for visits with a couple of
our more experienced builders. Gary Rene and
Dave Melby kindly let me stop by their shops
for short visits and some picture taking. All I
can say is that I was really impressed!
|
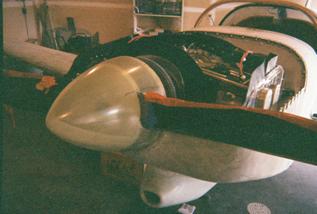
| A not-so-good picture (sorry!) showing the business end of Gary Rene's Celerity. Red protective tape is in place on the prop. Gary Rene's taildragger fixed-gear Celerity |
Our first stop was at Gary's garage, where his
extremely well done Celerity project looks like it
might be 90 per cent completed. It basically
lacks paint and minor items.
Over the past year Gary has completed
fabricating his engine cowling and completed
much of the cockpit work including a beautiful
instrument panel installation. The airframe is
presently almost ready for paint.
First to catch my eye was Gary's composite
Q-Tip prop from
Prince Aircraft Co. (Ph. 479-
877-5557). All black and shiny, this propeller
will really do the job of translating all 180 hp in
his Aero Sport engine to short takeoffs, great
climb rates, and high cruise speeds!
We surely look forward to getting the
performance figures back on this engine and
prop combination. You can contact
Aero Sport
Power in BC, Canada, at 250-376-2955.
|
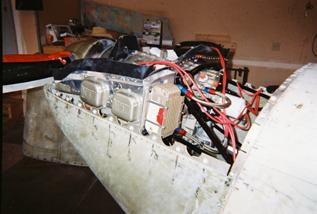
| Aero Sport Power O-360 engine, as installed in Gary Rene's fixed gear Celerity. Note the cowling fastener system. |
Gary's cowling is made in just two pieces, top
and bottom. It fastens to the fuselage and along
the lateral joints using high quality countersink
type fasteners. The firewall is stainless steel and
it has VERY FEW penetrations, the mark of an
extremely well executed installation.
Block sanding of Gary's Celerity is complete
except for cowling touch-up, so it won't be long
before paint colors and layout can be chosen.
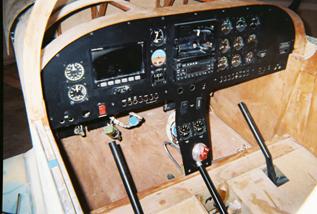
Gary's panel has an EFIS primary display
with backups as needed. It is a really clean,
attractive panel, fabricated by
SteinAir, Inc. of
Farmington, MN. (Ph. 877-282-8996).
The fuel selector and individual (not two-in-
one) fuel quantity gauges are sensibly laid out
for easy interpretation. This is a very important
consideration for those occasions when you are
busy in the cockpit with bad weather, darkness
or other problems.
|
| Gary Rene's instrument panel with EFIS and "steam gauge" backups as needed. Note the two individual fuel gauges and fuel tank selector just above the flap handle. |
Some thoughts on fuel selectors
This brings up an important point in aircraft
design and construction. Since one of the
leading causes of aircraft mishaps is fuel
starvation EVEN THOUGH THERE IS AMPLE
FUEL ON BOARD, you need to think carefully
about your fuel selector and gauge layout like
Gary did when you build your airplane.
After all, the big three U.S. airplane
manufacturers have all gotten it wrong in the
past. They have been guilty of locating fuel
selectors far away from the gauges, sometimes in
odd places where they are not even visible to the
pilot! The operation of their fuel selectors may
not be intuitive either, especially if the pilot is
under pressure.
I know that this can be a real problem. A few
years back, a business acquaintance of mine
phoned me with details of his recent plane crash.
He was a relatively new, but serious and
otherwise careful pilot, and he had sadly cracked
up his friend's airplane due to fuel selector
confusion while under pressure.
My friend was transitioning from a high-wing
gravity fed Cessna fuel system (fuel "on" or
"off") to a low wing Piper. The Arrow had its
gauges up on the instrument panel and the "left"
or "right" fuel tank selector was mounted down
low on the forward sidewall of the fuselage.
His checkout in the aircraft apparently did not
cover the fuel selector and he was too low and
slow to figure it all out before the aircraft came
down on rough terrain. Fortunately he walked
away, but the damage to his friend's Arrow was
extensive.
I have owned all three types of the offending
aircraft (i.e.-two Beechcrafts, two Cessnas, and
a Piper Cherokee, among others), and to my way
of thinking none of them had a truly sensible fuel
gauge and selector layout like Gary's Celerity
has. Enough said!
Dave Melby's Cavalier(s)
Some of you may recall that
Dave Melby was
a fellow Cavalier builder along with
Celerity
designer Larry Burton.
In the early days of Mirage Aircraft, Dave and
Larry, assisted by
Bruce Boylan, had together
constructed the Celerity prototype. The three
also partnered to initially market the plans for the
Celerity design in the mid-1980's.
In addition to his Cavalier, Dave Melby also
formerly completed building a Celerity fuselage,
with very good workmanship I might add. This
fuselage is currently owned by
Don O'Rourke.
|
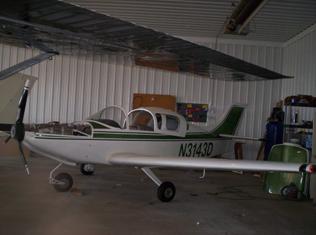
| Dave Melby's Cavalier-the cowling top is standing behind the wing at the right. |
You may have seen a Cavalier before, but it is
doubtful that you would have seen one as nice as
Dave Melby's! I never saw it before its recent
rebuild and renovation, but I can tell you that
today it is one beautiful airplane!
No matter what angle you look at it, Dave's
Cavalier shows a great deal of care and attention
to detail. It is professional looking through and
through.
Dave has used the fiberglass main gear legs
from a Grumman for his Cavalier. He has also
made his wing tips in an upswept configuration
"just for looks." From what I have read about
wing tips they can be all kinds of shapes, from
Mooney's square cut-off style to rounded tips,
from drooping to upswept, and so on.
|
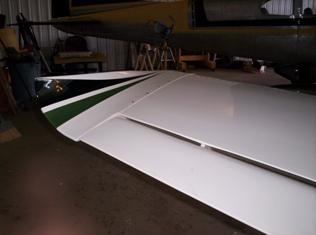
| Upswept wing tips lend Dave Melby's Cavalier an air of class. |
One shape you don't want to guess at though
is the shape of the prop. Dave has built his own
wood three-blade fixed pitch propeller, a thing of
great beauty. Fortunately he already had some
experience with this challenging task, having
built a similar prop before this one.
At any rate the propeller looks like it was
built by a master craftsman, a term that fits Dave
well. Of course, his lengthy career in that other
"homebuilding" arena, building houses up til his
recent retirement, is great background for
someone undertaking such a task.

|
| Dave Melby's self-made wood prop. ("Yes, I'm going to put wheel pants on also!") |
Note that the skin on the Melby Cavalier is
made of fiberglass over foam, unlike the original
plans that called for fabric and plywood skin.
This was the way that Larry Burton's Cavalier
was finished, as well as his Celerity prototype.
However, he's not necessarily wedded to
fiberglass skin. The fuselage of his newest
project, a Cavalier hybrid, is shown below ready
for the fabric to be applied over the wood and
along the fuselage sides.
Although the fabric skin is a return to the
original plans, a few other design features are
being modified on this aircraft to suit Dave's
quest for simplicity. The light weight gull wing
door is visible in the photo, but there are several
other innovations also.
We will cover some of Melby's design
innovations in a later issue. Even though his
project is not a Celerity or Marathon, it is of
interest to nearly everyone who is building an
airplane, no matter what their design.
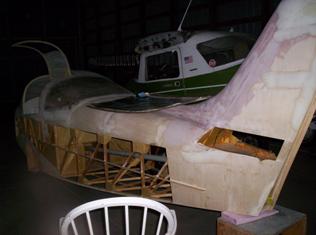
|
| Dave Melby's new Cavalier project, to be covered with wood and fabric. (In back is a Cessna fuselage sharing hangar space.) |
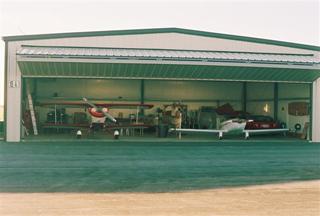
|
| There's also his award winning Rand KR-2S, and the VW bug! Did we forget anything? |

Coming in October-Dave
Christensen's Marathon
TD = great workmanship!
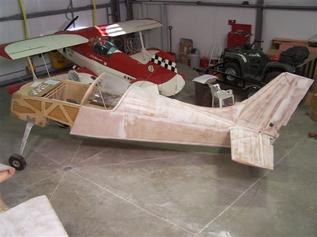
|
| Dave Christensen's Marathon project, with his Acrosport biplane in the back. |
© 2010, Mirage Aircraft, Inc, Tuscon, AZ
