February, 2007
Celerity project makes a loo-ong move
Another Celerity project has been sold to a new builder, who now jokes that his Celerity already "...has more miles on it than it will get during its first few months of flight!"
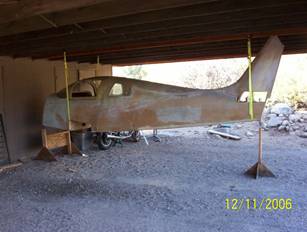
Don O'Rourke of Tucson, Arizona, had purchased a fuselage box assembly and wing structure from yours truly. Then he found out about a substantially completed fuselage and wing spars that were available.
The best part was, the fuselage had been built up by a seasoned aircraft builder, Dave Melby of North Branch, Minnesota.
Melby was one of the original builders working on the Celerity Prototype with Celerity designer Larry Burton, and Bruce Boylan. In fact, the three of them formed the original Mirage Aircraft Corporation to sell plans to builders.
|
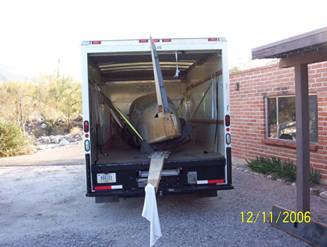
| The mostly completed Melby fuselage arrives in Tucson after it's second "cross-country." |
Before O'Rourke's purchase, the Melby project had been owned by Bernard Hettinger of Champaign, Illinois, who had begun con-structing the wings for this project. However, Bernie had to part with his project and it ended up in Pennsylvania.
I guess it's a given that if you find a good deal, it will be located the longest possible distance from wherever you are. Don O'Rourke wrote to us about The Big Move:
|
| Necessity is the mother of improvisation |
Eldon,
I have recently returned from Williamsport, PA after picking up the Hettinger/Melby fuselage.
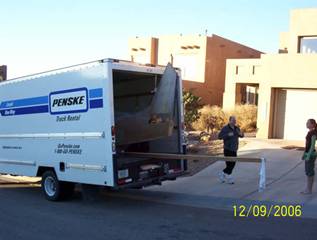
My building partner John Kennedy and I drove it from Williamsport , PA to Tucson in a rental truck. 2500 miles worth of entertainment.
We certainly got a lot of strange looks while driving with a plane sticking out of the truck. [I know the feeling-see below. Ed.]
We used a military cargo net and some
racheting tie downs to suspend the fuselage in the back of the truck. The military cargo net distributed the weight evenly and prevented damage to the
fuselage.
Everything went as planned and we arrived here on Sunday 12/10/06 after leaving on 12/06/06. My estimation is I have reduced my build time by a couple of years.
I currently have your Marathon/Celerity fuselage in the bare wood phase, as well as a spar that you constructed in a builders workshop for Bernie Hettinger, both are available for sale if a builder
would like a head start.
Enclosed are some pictures for your amusement.
|
| Celerity banking for left turn into parking area. |
I would love to have you inspect the fuselage I have purchased. Let me know when you might be free to take a look and offer some advice.
Talk to you soon,
Don O'Rourke
|
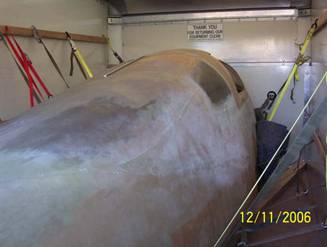
| The well-sprung fuselage. |
Hopefully the project arrived damage-free but we'll look it over carefully just to be sure. Having loaded and hauled both projects and completed aircraft myself, I can sympathize with those adventurous souls who must participate in such an undertaking.
It's always more fun when you don't have any trouble of course, and can just enjoy people's reaction to what's up there on the trailer or poking out the back of a truck.
Once I had a guy tell me that the completed Celerity on the trailer "Looks just like a Mooney!"
Another time someone asked me if (the fuselage) was a boat! Lots of laughs out on the front lines of aircraft transport.

Canopy construction options
Don O'Rourke's purchased fuselage has a completed sliding canopy and windshield. He is fortunate that he doesn't have to build these from scratch because it's a bit of a project.
Gary Rene of Savage, Minnesota, purchased a Van's RV canopy for his fixed gear Celerity project, covered in this newsletter some time ago, and it turned out very well.
There are several ways to tackle building the canopy on your Celerity or Marathon. The original design featured wood canopy bows and stringers, as shown below:
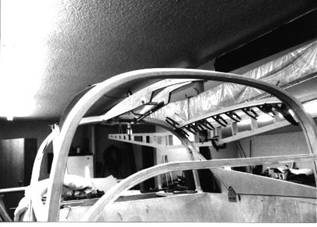
|
| Wooden canopy bows and stringers on the original Celerity prototype under construction by Larry Burton and friends. |
Alternatively, you could make the frame out of welded steel tubing. The hardest part about using steel is sticking the foam and fiberglass onto it-you might have to weld a few tabs on it and use some other fasteners such as rivets, at the corners for example, to keep everything firmly held together.
Another approach is to make everything in one piece from the windshield to the tail using foam core fiberglass. This could be done over temporary foam bulkheads and may incorporate wood stiffeners in the turtle deck at the builder's option.
Next draw the windows and canopy lines, lay in and bond your wood canopy framing, and lastly cut it loose with a fine-tooth saw. This would result in the best fit, although it would be a little more difficult to fabricate.
If it's done right, I think you can make a foam core canopy, about 1 in. of foam with fiberglass on both sides, that may not even need a wood or steel tubing frame.
For a treasury of information on this topic I highly recommend Chapter 7, "Canopies/Windshields" in The Sportplane Builder, by Tony Bingelis.
All the Tony Bingelis books are available from the EAA bookstore, from our suppliers Aircraft Spruce & Specialty Co. and Wicks Aircraft Supply, and through various other vendors.
Tony described and diagrammed several great suggestions related to the problems of canopy construction and latching. He had a knack for always coming up with simple, elegant solutions to common problems faced by homebuilders.
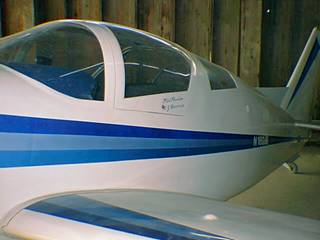
|
| The conventional canopy on Jim Glencross' Celerity has beautiful fit and finish. |
Aerodynamic forces on canopies
One of the biggest problems with most canopies is aerodynamic lift at cruise speed. This effect can be seen on auto convertible tops puffing up on the highway even though they are stretched quite tightly when they are built.
Just have a door on a Cessna, Piper, or Beechcraft pop open in flight, and try to close it without landing! It is virtually impossible to shut again due to aero-dynamic lift (ie-low pressure outside the aircraft) which holds it open with a great deal of force!
(A side note--This same pressure differential can cause all kinds of cooling problems. Normally you have high air pressure under the cowling where the carb air intake is located, which is good. But that same high pressure can act against you when you want to exhaust cooling air from the engine compartment out into that high pressure area!)
I have heard that an aircraft canopy can have several hundred pounds of lift acting on it! And yes, I have heard of a canopy breaking loose in flight and taking out the vertical stabilizer, resulting in the crash of a non-Mirage design.
You could install aircraft grade safety cables onto the canopy such that if the latches fail the canopy could only go so far before the cables would stop it.
Obviously you will have to devise a way to securely hold the canopy down, front, rear and sides, not only for safety purposes but also to reduce wind noise through the cracks.
Sliding canopy seem to get pushed forward in flight by aerodynamic forces, so it doesn't take much to hold it in the forward position. The main problem is holding it down against upward lift forces.
I like fixed, angled steel pins in the canopy edge that engage holes (with bushings) in the windshield bow for a tight fit.
There is a tendency to worry more about the front of the canopy lifting, but the rear needs to be held down tightly also!
Naturally the latching mechanism should be quite solid, and it should be visually obvious (by handle position for example) as to whether latch is fully engaged or is opened.
Also the upper rear canopy track must be very solid. If you have a center track going down the top of the turtle deck, it should be attached firmly to structural bows underneath, not just the skin.
And the tracks alongside the pilot and co-pilot side rails (at shoulder height) must also be firmly attached. Plus the wheels and trunnions on the canopy frame should be strong and solid, as these will undergo the most strain if a latch should fail.
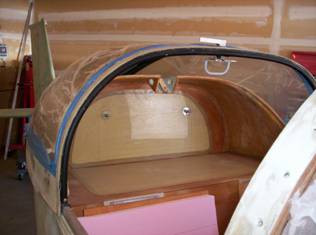
|
| Gary Rene adapted the Van's Aircraft RV-6 canopy for use on his fixed gear Celerity. |
The articulated, lifting canopy
I'm sure that we have all been impressed at some time with the fighter plane that taxis up with it's canopy pushed up and back on swinging arms. This articulated canopy concept is what Larry Burton used on the first Celerity.
There are two considerations that I should make you aware of if you decide to build and install a lifting canopy as on the original Celerity.
One is that you literally have to lift the entire canopy up and back some distance to get in or out of the cockpit, which requires some effort.
However, a clever builder could devise springs or lifting struts to assist with this chore.
Another thing you will have to deal with is that when the canopy is in the open position it can really catch the winds out there on a breezy ramp.
So sometimes during strong winds you have to use some common sense to prevent damage, like maybe blocking the wind with your body and holding on to the canopy with your free hand during entry and exit.
Larry told me that was why he decided to change over to a sliding canopy on his second project, Celerity No. 2.
Still, not everyone is convinced that the idea of a lifting canopy should be scrapped. Builder Mike Toft of Edgewater, Maryland, has designed and fabricated his own powered, articulated canopy lifting mechanism that makes things a whole little easier.
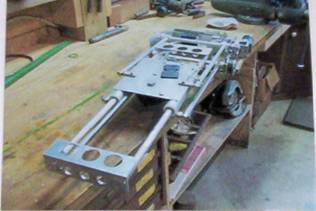
|
| Mike Toft's powered canopy lift for his Celerity. |
Mike notes that, "Close tolerances make it surprisingly stable, and the weight is not as bad as you might think!
Just looking at Mike's canopy lifter is a humbling experience for many of us-it looks like something you would expect to find in an aircraft built for, say, $300,000 or so! But if you've got the smarts, the tools, and the time, it is an elegant solution indeed.
Other (non-sliding) canopy options
Other canopy options include the hinged canopy. It can be hinged at the front (firewall) as in the Pulsar, or at the rear, or even at the side (Long-Eze style).
In any of these designs you still have to lift the weight of the entire canopy, but it's a little easier layout for you to install compressed gas struts to help do some of the heavy lifting.
Another variant is the gull-wing door or doors. If only one gull-wing door is used the common practice is to make it a "two-thirds" gull-wing door. In this case if it opens from the pilot's side the hinges are located across the top of the cockpit but to the right of the fuselage centerline by say 6 to 12 inches
Of course, one of the biggest advantages is the fact that there isn't so much weight to lift when you're opening it, since the hinges suspend about half of the mass.
Also, the hinges themselves act to "latch down" that part of the door so you only have to latch one side, unlike the lifting or sliding canopy that has to be latched or engaged all around when closed.
However, just like the lifting canopy, you have to plan on surface winds raising havoc when it's breezy outside. (Sometimes it seems like you just can't win!)
Plexiglass canopy windows
Our canopies will all have to include windows and you are free to design your own window shapes, i.e.-square corners vs. radiused corners, tall window vs. shorter window, etc.
The toughest part will be forming the plexiglass for your windows and windshield. You will need a form (fiberglass is OK), a pair of soft gloves, persistence, and practice to get this right. It also takes a patient wife who's willing to lend you her oven! Of course, for bigger pieces you get to make your own oven.
Naturally you are always better off making simple curves in plexiglass rather than compound curves. But for the truly gifted among us, you can make some real elegant plexiglass shapes for your airplane!
There is quite a bit of information available out there on forming plexiglass. Basically you carefully heat it to the critical temperature, grab it with your nice soft gloves, and then just smooth it out over the form you have made.
We will conclude this dissertation on canopies in our next issue. Until then, build and fly safely! Ed.
© 2010, Mirage Aircraft, Inc, Tuscon, AZ
