December, 2006
Is it the elves or what?

|
| Merry Christmas to all! |
This is the time of year for magic, for mystery, and a time when you can actually see rebirth and renewal. You don't think so? Well, just look around you.
How else do you explain hordes of people, up til then completely sane and normal, standing in line in the cold, sometimes for days, to buy an electronic game! People who maybe spent their whole lives acting normal are suddenly possessed by something that's inexplicable.
I don't understand it. Maybe it's something in the winter air, or in our circadian rhythms, that causes us to exhibit this somewhat restless, mysterious behavior. (Is nature giving us energy to work off that Thanksgiving dinner fat? Who knows?)
In this business, we see a renewal or rebirth of interest in homebuilt aircraft projects, and we see probably as much new builder activity in a couple of months as in the entire rest of the year.
It's no accident that Kitplanes publishes its annual homebuilt aircraft directories at this time of year! It's perfect timing to help all of us, with our newborn or reborn ideas and hopes, to choose that perfect aircraft project.
"In the meadow we can build a snowman..."
Restlessness plus spare time equals action!
Whatever the cause for this restless activity mode, we welcome it. Those of us who are project oriented get a new spurt of energy, free and not even asked for, that helps us to just get going and do something.
It's the time of year when, if you live in the south like I do, you can clean out that shop, get things rearranged, and actually start work on a project.
And if it's too cold in your shop, then you can busily absorb yourself looking up information on the Internet about various aircraft designs.
You can also spend time becoming more active in your local EAA chapter and pumping fellow members for information.
Or maybe you'll even become motivated to actually order that set of plans and start studying them, and ordering some of the materials that you will need to get started when it warms up out there.
Coincidentally, Christmas is that perfect time of year for a gift of tools that will make your aircraft construction so much more easy and pleasurable.
Whatever the cause, and whatever the result for you and yours, we wish you happy holidays and the best of everything in 2007 and beyond!
Web site reborn, now includes our newsletter! But we need your help...
One day awhile back Karen and I were headed for Starbucks. I was in kind of a bad mood, so I needed some warmth (Starbucks latte) and understanding (that of my lovely wife).
I had retired from my regular job, and it seemed like we were at a standstill. So I was trying to decide if I should pull back on our aircraft promotion and activities, or should I hang in there? Or, perhaps I should try even harder to push our two designs with our somewhat limited resources?
I had been discussing the ins and outs with Karen and I was honestly not sure which way I should go with this. I couldn't put my finger on it, but apparently I had an inner voice telling me I should do something. Or, do something differently.
Strangely enough my cell phone rang in Starbucks parking lot. It was Celerity Builder Andy Campbell of Sammamish, Washington, on the other end of the line.
After the usual pleasantries, Andy floated his thoughts, suggesting that we put up a new, improved Web site. And, he would do the work!
Never one to walk away from the dessert table, I quickly agreed and we began working on it. (I say "we," but it was actually "he" who was doing most of the work--I just put forth some ideas and complained now and then...)
The result today is our good and still growing Web site, www.mirage-aircraft.com, of which I am very proud. Look it over, it's great. And now that Andy has posted some of our newsletters on the site, we are already attracting more info seekers.
The "
Projects" page needs your help
Now here is where some of you fit in-we need your help! If you click on our "
Projects" page you will find a link to Dave Melby's excellent Cavalier site. To refresh your memory, Dave was an old friend of Larry Burton and he helped build the Celerity prototype. Our Web sites are now cross-linked to each other.
So now here is your chance-Show others your great project! Just go to our Web site, punch the contact button for Andy, and then send him the latest photos and info on your Celerity or Marathon project for display on our Web site.
I would like to see many of our builders' projects listed on the Web site, so let's get going while we're in that restless Christmas mood, okay? So please, EVERYBODY submit a capsule report on your project and at least one photo, okay? Thanks!

Celerity and Marathon wings detach. So why not the tail?
Today's burning question, at once both posed and answered by Celerity builder Andy Campbell
In our last issue (October 2006) we ran some tips from Celerity builder Andy Campbell, where he outlined his alternative method for making wing leading edges and fuel tank shells. This time we continue with Andy's submittal:
"I have also made a change in the design concerning the mounts for the fin and stabilizer. I have learned in my years with airplanes that if something sticks out, it eventually gets knocked around or damaged.
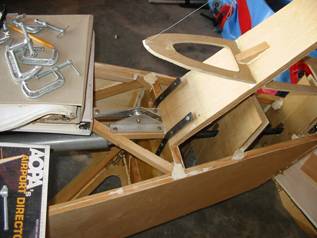
|
| Fin spar mounting tabs for removable stabilizer - Mounting tabs on forward face of front fin spar |
"Things like wings, stabilizers, and even fins tend to be the most damaged parts. Gluing them to the fuselage seemed like a way to make things difficult to maintain, so I decided to bolt the fin and stabilizer to the fuselage.
(Ed. note-There may also be other good reasons to make the tail or other things that stick out removable. You may have limited horizontal shop space to build an 8-foot span horizontal stabilizer onto the fuselage box. Or, you might simply have too low a shop ceiling, especially with the garage door occupying the top foot or so of vertical space.
Constructing removable tail feathers helps you to cope with these or other space limitations that you have to deal with. In some cases it may enable you to go ahead with construction that would otherwise be impossible due to your specific garage or shop constraints.
|
| Mounting plate on aft face of the forward fin spar |
"The two photos show the forward fin mount. They are simply made from sheet steel. Bushings were cut to fit in the forward fin spar and glued in the wood. This reduces the compression stress on the wood and hardens the area worked on by the bolt, spreading its load, similar to the aircraft's wing, landing gear, and engine attachment fittings.
"There are 4 bolts in the fin spar, and 4 in the frame it mounts to (frame 9). Blocks of wood are glued into frame 9 to provide a solid piece for the bolt. They also have bushings glued into them.
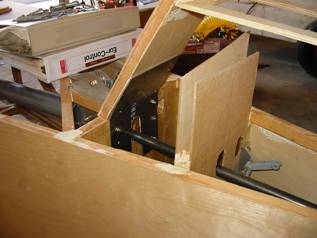
Rear fin (or "tail post") spar also bolts into place.
"The rear fin spar is also mounted using a bracket I designed and welded together. The tailpost mounting given in the plans has been modified to use a solid piece of wood cut and glued to the angle specified in the plans.
|
| Tailpost is bolted to the welded steel angles at extreme aft end of the fuselage box assembly. |
"The plywood is continued right onto these pieces, increasing their strength. Bushings are glued into these and the brackets are bolted to the inside.
"This 'turns the corner' to create rear facing holes that can attach to the rear spar. It too has been modified to provide solid wood (with bushings) where these bolts go.
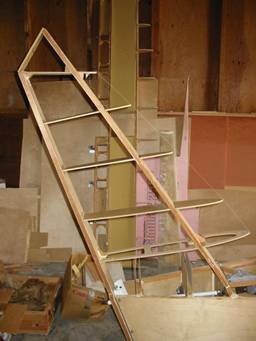
"Bolt the spars in place and construct the fin normally according to plans. Then you can unbolt the whole affair when you want!
"After completion, you will have to derig the rudder of course, but that sure beats dealing with
something that is glued on.
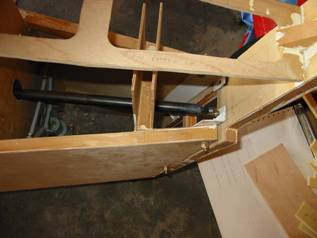
|
| Rear fin being assembled in place. |
Removable fairings complement the modification
"There is another point to consider. By making the fin and stabilizer removable, you will need to construct removable fairings between them and the fuselage (and between the fin and stab!).
"These removable fairings will also provide an excellent way to get to the tailwheel mechanism from the top, making it possible to construct small access holes in the side instead of the larger hatch shown in the plans.
"The small holes are used to slide in the 1/4 inch steel pivot rods used by the landing gear. It also lets you get into any wiring you put in there, antennas, beacon or nav lights, etc. This is a good place to put in a connector for these items!
Aileron bellcranks and miscellany
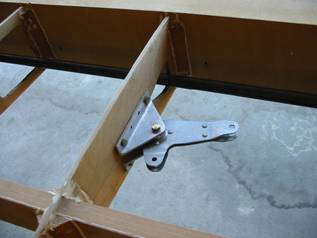
"The picture below shows one of the aileron bellcranks. The mounts shown in the plans are quite shallow. I deepened them to provide additional clearance for the bellcrank.
(Ed. note-Builders please be aware that if you extend these mounts, you may have to lengthen the aileron control rod that runs from the control stick to the aileron bellcrank.)
|
| Aileron bellcrank mount, made from aluminum angle and bolted to the wing spar, is shown deeper than the Celerity/Marathon plans. |
Addenda to the fuel tank construction info provided in our October 2006 newsletter
I inadvertently left out the following from our article on Andy's fuel tank construction. Ed.
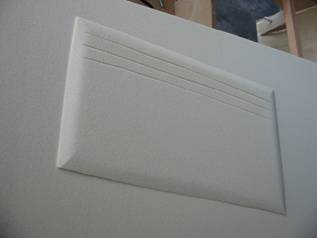
"The picture below shows a stiffener that's going into the leading edge fuel tank. Note the kerfs cut into the foam so it conforms to the curved inner surface of the tank.
|
| Kerfs (grooves) allow foam stiffener to follow the curve inside the leading edge fuel tank. |
"The picture at upper right on this page (next column) shows the application of similar foam stiffeners to the stabilizer leading edges, leaving gaps where the ribs will go.
"Well...that about wraps up that ole' can o' glue... wish we could have met up while you were in Seattle [last summer]".
Andy Campbell
JUST FOR LAUGHS

|
| Airline Captain's "Take your child to work" day |
© 2020 Mirage Aircraft, Inc, Tuscon, AZ
