December, 2005
Happy New Year to all!
As I write this, I find myself wondering once again, "What has happened to this past year?" Actually that's a good sign-if life is going well for you, the year slips by quickly.
And if you're miserable, time passes ever so slowly, as noted by Oscar Wilde in The Ballad of Reading Gaol (with my apologies to the author for accuracy-this is from my failing memory):
"I know not whether I be right or whether I be wrong,
I only know the walls are cold and that the bars are strong,
And every day is like a year, a year whose days are long."
Oscar Wilde
So we should be overjoyed that the past year was a "short one" for us. We have been busier than usual around our household this December, and not without problems either.
Yet we feel blessed to have lived and loved so long, so well, and of course to have the freedom to dream, to build, and to fly.
As we look out into the future, this year called 2006, it is a time to reflect, a time for me to send a special message to those of you who make up our inner circle of airplane builder friends.
We wish for each of you a special year of good cheer and hope: May the wind and the weather be kept at bay, may your shop be kept warm and dry, and may your families, your hands and your heart find satisfaction in building the airplane of your dreams.
And to the rest of you, whether or not it is in your heart or hands or budget to ever build and fly your own airplane, we wish you joyful times as you vicariously participate with the rest of us, building that vision of a personal airplane in your thoughts and dreams.
Joy, peace, and goodwill to all!
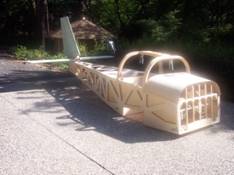
Weighing your project airplane--the right way! or, "Honey, have you seen my bathroom scales?"
|
| Hopefully your aircraft's designer has made adequate plans for all loading phases, both while you're on the ground and in flight! |
I have had more builder inquiries about weight and balance this past year than any other single item. It seems that for some it's plainly a mystery. But for most builders, they simply need some guidance to make sure they do it right.
Let's review some of the basics here, hopefully demystifying what is actually a fairly straightforward procedure.
What are we doing here?
The purpose of doing a weight and balance exercise is two-fold. Number one, the total weight of the aircraft has to be determined to ensure that we don't end up overloading it aerodynamically. After all, the airplane can hold a lot more weight on the ground than it can support in the air!
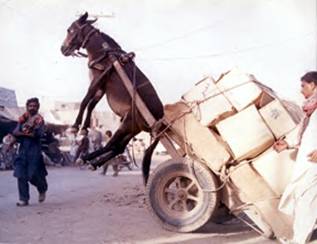
And second, that weight needs to be distributed properly. I think the donkey and the driver in the above photo can attest to the importance of balance!
Fortunately, since you are an airplane builder, there are several things you can do to hold down your airplane's weight or to correct an unbalanced condition.
You are in a lot better position now than if you had bought a completed project that was built hopelessly "fat" or that had a Center of Gravity (CG) problem!
So we will talk about how various problems can be solved, and then ease into how we determine ahead of time whether or not we are going to have a weight or balance problem. This will probably take several articles, so please bear with me.
Balancing acts
Even after certified airplanes have been completed, changes are sometimes made in the interests of balance or ground handling that a sharp eye can spot on a flight line.
For example, we have all seen some of the old photos, where a pole was used to keep the tail of an cargo plane up off the runway during loading operations. Hopefully this was only to assist while cargo was being pushed to the back, and not an indication of how tail-heavy the airplane would be once it left the ground!
The support pole is a passive system, which you must put up and take down every time you load or unload. An active system is one that is left in place and continually helps remedy a problem.
Landing gear extensions are an example of an active tool to aid aircraft balance. These can be installed to move the main gear axles and wheels slightly forward (taildragger) or slightly aft (tricycle gear) to make up for static balance problems. Or, a tailwheel spring can be extended farther to the rear to help make up for too short a fuselage.
Another common "balancing act" is to move the battery further forward or aft, as batteries are heavy little buggers and their placement can have quite an impact on the airplane's static and dynamic balance.
Early detection
Beyond the fact that you want to be able to step up onto the wing without the tail crashing to the ground, early determination of your airplane's weight and balance parameters can help to avoid embarrassing, or even fatal, forays down the runway with too much weight on board the aircraft for sustained flight, or perhaps even for successful rotation.
Staying within the design maximum weight and having proper balance (a CG that is within prescribed limits) contributes to harmony, or to harmonious controls. Imbalance leads to dischord or even worse.
If your airplane is too tail-heavy the controls become light and "skittish," or unstable. If your airplane is too nose-heavy the controls become "leaden" or overly heavy.
Either condition, in the extreme, can make the aircraft uncontrollable, regardless of whether the max gross weight is exceeded or not! Just as you can stall your airplane at well over the "normal" stall speed, you can design or load an airplane so it's dangerously unbalanced even with an acceptable total gross weight.
Start out by collecting some information. Our Celerity or Marathon Builder's Manual section on weight and balance runs over 20 pages. (Come on, it's an easy read-it's all double-spaced and there aren't any real big words!)
Our Builder's Manual also includes graphic forms where you just enter the numbers and make a few easy calculations, thus simplifying the process.
There have also been periodic articles in the trade publications, such as
EAAi's Sport Aviation, Kitplanes, and Private Pilot magazines. These cover the subject very well in a generic way. This is fine because the weight and balance procedures for a 747 are the same as those used for a Celerity or a Marathon. The only difference is the equipment.
Prepare yourself
At the very least, if you are new to performing a weight and balance procedure, I would advise you to read an article or two and check out the instructions in your Marathon or Celerity Builder's Manual.
If you can find somebody in your EAA chapter who is preparing to do their weight and balance, this would be a good time to volunteer to help muscle their project around, and thus learn a few things along the way.
When you get to the point where you start to ponder "weight and balance," it's time to line up a few bathroom scales, yours and those of your friends.
Chances are, your scale will register up to 300 lbs. and no more. If that's the case, you can use two scales per tire, one beside the other, with the tire sitting on a stout piece of wood that spans both of them, and then add the two scale readings together.
At this point let me emphasize that you do not even need to have a tire, or a wheel, or even a landing gear leg in order to weigh the airplane. All you need are three weighing points and accurate measurements of their locations, as well as the locations of various items such as the firewall and the main spar.
Even the choice of a fore-aft datum point is somewhat arbitrary, since you can mathematically account for its position vis-�-vis the center of lift of the wing, for example.
Setting up the scales and the airplane
So choose your weighing points, usually the main gear and nose or tail wheel locations, and have your spouse and kids carefully roll the plane up onto the scales you've borrowed from your wife, your co-worker and your neighbor.
Now level the fuselage on the scales. You cannot weigh your airplane just as it sits on the ramp, with the tailwheel on the ground, for example.
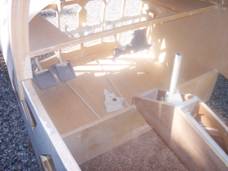
With the Celerity and Marathon, the top of the fuselage box assembly beneath the "turtle deck" must be level. You may have to use wood shims under the main gear and nose wheel (Marathon) to achieve this.
For the tail wheel (Celerity), it's easiest to just place that scale on top of a small drum or a pile of milk crates, until it centers the bubble on that level you've placed atop the baggage compartment.
Now extend a plumb bob from the front face of the firewall and the main wing spar at the right and the left sides of the fuselage. Mark these locations on the floor, as well as the locations of the weighing points using "X" marks.
On your shop floor, draw extended transverse lines through the wheel axles and longitudinal lines through the tire centers, giving you reference crossed lines. These lines will allow you to go back after the actual weights are recorded and determine the exact locations of the tires (weighing points) in relation to the fuselage centerline, main wing spar, etc.
And yes, you will also need to use your plumb bob to note and mark on the floor your airplane fuselage centerline at the firewall and the tail.
Now if you're kind of a techno-freak, you can buy a laser level thingy for about 8 times the price of a plumb bob and get your kicks moving it around while the cat chases the red spot. I will allow that the laser level does make things easier. But it's hard to justify the expense unless you have other uses for it. Best to borrow one from somebody else!
So go ahead, mark everything on the floor and then record the three weights. Now you can discard the airplane (just kidding!) and get down to business.
Datum point
Adding up the total of the three weights is an easy one, so now you know your airplane's empty weight (or "EW"). If your project is not that far along yet (seats aren't in, no prop or cowling yet, etc.) you can add in the estimated weights of the missing items to come up with a reasonable approximation of the final empty weight.
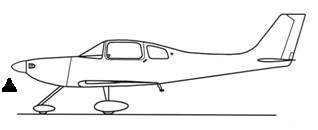
|
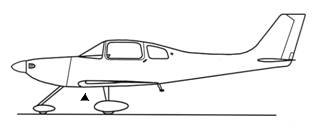
| The CG of this empty airplane is denoted by the triangle. It looks like it will be nose-heavy until the pilot and perhaps a passenger and some baggage are aboard. |
But the determination of the CG is the most significant part of this exercise. You probably have more control over that than you do the total weight, and also it's the easiest to change in order to make a correction.
First off, we must reference all our weights to some fixed point, a "datum" point or line. Now the selection of this is arbitrary. All it is at this point is a convenient, easily locatable point fore-and-aft at the center of the fuselage (not right or left of center).
I have chosen to use an imaginary point 60 inches forward of the front face of the main spar as a datum point, which helps to avoid having to "add" some readings and "subtract" other readings, which would happen if the datum point were near the actual CG of the airplane.
|
| The reference datum point on our example is 60 inches forward of the front face of the main wing spar. This is an arbitrary point that we will use for all of our CG calculations. |
Let me emphasize this is an arbitrary point, but as long as we stick with it that's okay. Cessna used to use the front of the prop spinner as the datum, and other manufacturers have used the front of the crankshaft (prop mounting flange), the front of the firewall, or some other arbitrary point.
Now once the datum point or datum line (a transverse line, like the firewall or front face of the main spar) has been established, we have to know what to do with it.
For purposes of discussion today, let us assume that the front face of the main spar IS the exact CG point of your empty Celerity or Marathon. This means that, for purposes of good stability, we will want the aerodynamic center of lift at or slightly aft of this point. (Remember, a slightly heavier nose is preferable to a heavy tail in flight, for purposes of enhanced stability.)
The aerodynamic center of lift of the wing is hopefully the point around which all of the aircraft's weight is somewhat equitably distributed in flight. It can be calculated for wing forms in the absence of measurements. (Who has the equipment to perform weighing in-flight?)
Next issue-Performing the weight and balance! (How exciting!) Ed.

For Sale-Gary Briley's project!
"All materials included to finish except 6mm ply for wing ribs. Incl. foam, fiberglass, all hardware, tubing, etc., hinges, brackets complete and most are painted/powder coated. Com antenna and IFR antenna built into vert. stab. and horiz. stab. incl. cables to reach inst. panel. I have some electric wire also, three trim servos are included and wiring. Incl. center stick control!
Will sell everything incl. 3 X 16 table and all my special tools, spare parts, plans and videos for $5,500.00 FOB Paradise, CA. I have spent $10,373.00 to date.
Gary Briley, 6637 Creekside Dr., Paradise, CA 95969 (530) 872-8892 or email at glb_31@pacbell.net."
© 2010, Mirage Aircraft, Inc, Tuscon, AZ