August, 2005
"When will I ever finish...?
"Am I slow or what? Those other guys couldn't have taken as long to build their fuel tanks as it took me to build mine!"
"How come some of these guys are so far ahead of me and my project? Will I ever get this thing done in time to fly it, or will I be too old?"
Many of us, in our anguished moments, have thoughts along these lines. It's natural to become impatient at times as we labor away on our airplane projects and we begin to wonder if we will ever see the light at the end of the tunnel.
What's the problem?
After all here we are, still laboring in the shop, while these other guys are out flying their homebuilts. "I tell ya, it's not fair! I must have thousands of hours in this thing already."
If you are at that stage in your project, the equivalent of the old college boy's "Sophomore Slump," maybe it's time to discuss the problem.
First of all, let's not kid ourselves. Building an airplane (or a house, or a hot rod or whatever) is a significant undertaking, no pun intended. It takes a special type of person, one with vision, good discipline, and an optimistic attitude.
We know already that those undisciplined, pessimistic types who lack a vision of their future need not apply. We builders are a select group, and while we are at it we'll just take a little pride in that too!
But even the most dedicated of us may sometimes feel like we have hit a stone wall. We find ourselves asking if we are really up to it.
Oftentimes this is a natural stage in our progression as builders. And I will further assert that without doubts, few breakthroughs would occur.
What's the solution?
I will avoid the usual bromides, instead focusing on possible breakthrough thinking that may help some of us. It is inspired by a piece that Gary Briley passed along to us some time ago, and that I ran for everybody's benefit back in 1999.
The thrust of the presentation that is summarized once again here is that we often let ourselves get bogged down by outmoded technology, or by heeding the "safest" advice.
Read on for "breakthrough" ideas:

Better, faster, easier...
"Ok, ok, guys & gals, I am very surprised by the response. I hope I don't disappoint you.
"I should preface the 'rest of the story' with a quotation from the guy who made my life a whole lot easier!
(He said:) "'Technology is changing in the composite industry so fast it's next to impossible to keep up with it.' One other tidbit...'If it took me more than four days to repair a corvette or a few months to do a show car from start to finish I would be out of business.'
"And now...'For The Rest of The Story'...
"So here it is a couple of days after finding my composite guru who had agreed to come and give a hands on lecture on finishing composites to a show quality completion.
"I agreed to let him work on the upper surface on one of my Vari's main wings and winglet for the demonstration. Up to this point I had been filling and sanding using dry micro for over 8 months with very little to show for the effort. As you are all extremely aware, the contour of the wing is more than for good looks, it's darn right critical for a smooth and balanced flying machine.
"His name is Rick Castalano, he's been in the business for 40 some years, has finished more competition show whatever's than you can imagine and he wasn't cocky!
"The first thing he asked me was what materials and tools I was using. I explained I was following Rutan's instructions to the Nth degree. Dry micro, no more than 80 grit sandpaper, etc., and absolutely NO BONDO! Long boards with sandpaper attached to get the lines 'just so,' etc.
"He then went on to explain to the group how times have changed since 1976, over 21 years ago, when Burt Rutan first turned us all on to this method of building airplanes, and that there were now finish products available to those in the know that were strong, flexible, inexpensive and could be called BONDO!
"I explained that I was sort of cheating by using very small electric sanders on occasion, contrary to Rutan's rules, but... He shouted to the crowd, 'Hooray!' Tim's learned something that not only saves time, money, and doesn't compromise safety during the finishing process.
"He walked out to his car and came back in with the following:
* 2 - Blue steel straight edge 8" long (get various sizes from 2" out to 36", they're cheap but the 8" one is the one you will use most)
* 1 - Plastic palette about 24X24 (get two, they are used for mixing and one will wear out.)
* 1 - Gallon of EVERCOAT Z-Grip (a light weight filler that applies like butter, sets up according to how fast you want it to, and sands like a dream.) It took 5 to 7 gallons to finish mine. LongEze's would require more.
* 1 - Quart of EVERCOAT glazing putty (for small area filling)
* 1 - 3 foot flexible (plastic) long board.
* Lots of high quality sandpaper starting with Grade '32' and up to 600 grit with adhesive backs, or buy the spray stick stuff.
* 1 - Small square electric hand sander
* 2 - Semi-soft sanding blocks
* 2 - Gallons of acetone (for cleaning)
* Lots of paper towels (for cleaning)
"Evercoat products are purchased at any good auto body supply store along with the rest of the stuff. Shop around and you will find better prices at the major chains, roughly about $15 per gal to $10 at chains. There are all kinds of other brands and all are probably just as good (like epoxies) but this is what I was instructed to use from our Guru and I am vee-e-ry happy with the results.
"Ok now where were we?
"Oh yeah, Rick explains the one basic key is to start with a CLEAN working surface. Acetone each area you're working on just prior to filling that area.
"Place a small batch of the Z-Grip in the center of the palette (about the size of the palm of your hand. Then add a ribbon of the hardener (comes with the Z-Grip) from top to bottom. Read the directions, but I found you don't need as much hardener as they recommend. It goes off too fast if you use too much and you're stuck with a blob of nothing in a matter of minutes. Better to use less and enjoy the long working time and easier application.
|
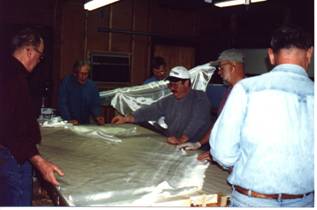
| Builder forums and workshops, such as the one in the foregoing article, provide builders an opportunity to learn more about unfamiliar materials and new craftsman techniques. |
"So Rich places a huge blob on the palette, adds the hardener and proceeds to mix them together on the palette using the 8" blue steel straight edge. In a matter of seconds the stuff looked all one color and Wham! He's filling a large section of the top wing (about two feet across) starting at the leading edge and smoothly working the stuff back to the trailing edge.
"He then proceeded up the winglet, again starting at the leading edge and working back. In about 5 minutes the stuff was starting to go off so he explained to stop right there and clean off the palette and straight edge with the acetone and paper towels.
"Note: It is very important that you clean the palette and the straight edge after each and every application! Keep the edge of the steel as clean and sharp as possible. You can rub the edge against 80 grit paper and this will sharpen it.
"With the palette and the straight edge now clean (3 minutes of work) he walks back over to the wing and instructs us to feel the heat exotherming off the fill. He then pulls out the long board, applies a strip of 32 grit sandpaper to the back and begins sanding and contouring at 45 degree swipes! I nearly had a heart attack! 32 grit! Yes, 32 grit.
"Tip: The 32 grit is used to cut through very quickly to get the basic contour very quickly, and before the filling has a chance to really get hard. Makes sense if you think about it.
"He then gradually sanded the surface with lesser and lesser grit sandpaper until he got to about 120 grit. All this took just under 30 minutes and when he was done the surface was smooth as a baby's butt and the shape of the wing was a work of art. He had completed more in that 30 minutes than I had in the previous month. He stood back and announced to the group that this surface was now ready for primer and paint (provided the rest of the plane was done).
"I can't tell you how easy this stuff is to work with. You have to go out and at least give it a try. The expense is nothing compared with how much fun you will have finishing your planes using this method and these products. I know, I know, there will be those of you who say this stuff won't bond to the glass and that later it will peel off.
All I can say to that kind of thinking is 'BullHockey'! There are million-dollar yachts plying the seas using this very same product and you don't see them coming apart. My plane has been flying now for three months with no sign of any delaminations, NOTHING!
"The plane was completed 5 months later with a beautiful paint job, also done by me, and I've never painted anything more than a house before. I'll explain how and what products and equipment I used to do the painting in a later story. Another myth will be dispelled in that story.
"Anyway, that's it. Go enjoy finishing your planes. Questions? Feel free to email me or post a message to the group and I will answer to the best of my knowledge.
"Sorry I took so much time and space. I do tend to blabber on."
Tim LoDolce, VariEze N26FM
Summing it up-by Editor
When I ran this account before, I added a few observations of my own. Being somewhat critical by nature, I pointed out that three months isn't a very long test period for delamination studies.
One thing I did not mention then was his use of five to seven gallons of filler. Please note, Larry Burton stated that if you're doing it right you will sand off about 95 percent of your filler, so five gallons may become less than half a gallon.
In aviation one always finds what I would call healthy conservatism. Sort of like this-"I know that sounds like a good idea, but the FAA, Lycoming and God have been doing it this way for years and I'd rather stick with what's proven."
However, true breakthroughs do occasionally come along that challenge long-held attitudes. Things like monoplanes, tricycle landing gear, Rutan's fiberglass airplanes, the Felix bicambered prop, etc.
Trouble is, being a conservative lot we are slow to try any new ideas, even those that promise faster, easier construction or a better result with new or different products.
Building an airplane is not easy. Airplane builders are among the hardest working, most dedicated people you will ever meet. All of us are, to one extent or another, racing the clock to finish our aircraft at a time in our life when we can still enjoy it!
So now we have a new material and a new technique that promises to make the builder's life easier and better.
The question is, how do you evaluate that claim, or the loads of other information dished out at EAA forums, in magazines, and during conversations with fellow builders?
Using the above story as an example, I too have heard, in Oshkosh forums, that only epoxy fillers will permanently stick to epoxy resins, therefore the time-honored method of applying only epoxy filler.
So there you go-new ideas, and possible break-throughs that might inspire some of us to at least work a little faster and get our projects finished. Maybe we should think of ourselves as the Corvette show car man who actually has to meet a deadline! Food for thought...
Top ten things you should never say to your checkride examiner
- I hold the school record for the fastest preflight.
- My dad is a US Air Captain, so this is a formality.
- Yep, 6 hours between bottle and throttle.
- How many FAA geeks does it take to screw in a light bulb?
- It amazes me how often Air Traffic Control is wrong!
- I know...no smoking 8 hours before you fly and no drinking within 50 feet of the airplane.
- Is that necktie a clip-on?
- I wish I hadn't taken all that cough syrup this morning!
- Checklist, schmecklist.
- When I think of you, I smile.
(Reprinted from Coupe Capers, the Ercoupe
Owners Club monthly magazine.)
For Sale-Quick-Build Kit!
Gary Briley's project!
"All materials included to finish except 6mm ply for wing ribs. Incl. foam, fiberglass, all hardware, tubing, etc., hinges, brackets complete and most are painted/powder coated. Com antenna and IFR antenna built into vert. stab. and horiz. stab. incl. cables to reach inst. panel. I have some electric wire also, three trim servos are included and wiring. Incl. center stick control!
Will sell everything incl. 3 X 16 table and all my special tools, spare parts, plans and videos for $5,500.00 FOB Paradise, CA. I have spent $10,373.00 to date.
Someone will get a real bargain! If I hear nothing from the group, Ebay is next. Gary Briley, 6637 Creekside Dr., Paradise, CA 95969 (530) 872-8892 or email at glb_31@pacbell.net." (Wood is Port Orford cedar-ed.)
© 2007, Mirage Aircraft, Inc, Tuscon, AZ