June, 2005
Part 2 of Composite Construction for the new builder
One problem encountered by most of us who are working with fiberglass
resin for the first time is that we are a little slow, perhaps
because we are initially unsure of what we are doing, and the mixture
may set up in the glue pot. A solution is to extend the pot life
of the mixture by substituting a different hardener. We use West
System No. 105 resin and No. 206 (clear) hardener. No. 205 hardener
(amber-burgundy color) gives significantly less working time before
it begins to set up, about half that of No. 206 hardener.

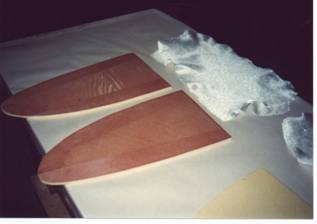
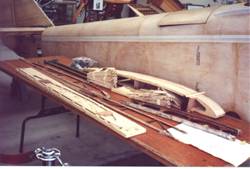
|
| All you need to begin that fiberglass layup! |
Whatever resin you use, it is important to protect your skin from
contact. I prefer to use "Invisible Gloves" No. 1211, a formulation
from Sun Magic International located in Florida, and available from
Wicks and probably Aircraft Spruce. It's convenient, comfortable,
and the resin won't touch your skin, only the protective coating.
The problem I found with latex gloves is that my hands would sweat,
and when I lifted my hand the sweat ran out of the glove, down my
arm, and dripped onto my work. Some people have reported allergic
reactions to fiberglass, although in some cases I am not sure if it is
the fiberglass or the resin that is causing the problem. I was told
that Larry Burton developed an allergy to Safe-T-Poxy and therefore
switched to West System epoxy.
In any case, a dust mask will help prevent the inhalation of glass
fibers. Long sleeves and latex gloves can help prevent itching.
Although I have allergies, I'm not allergic to the fiberglass or the
resin--it's all those "natural" plants, molds and dust out there that
cause my problems.
Types of foam core material
There are several types of foam available for homebuilders to use for
core material in fiberglass construction. The blue type that is cut
with a hot wire is Styrofoamź. People often associate Styrofoamź
with picnic coolers and coffee cups, although the latter have not
been made out of Styrofoamź for a number of years.
|
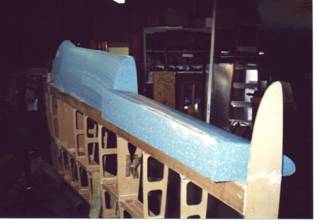
| Aircraft Styrofoam for a fuel tank plug. (polyurethane will be used for the actual fuel tank and baffles) Styrofoam is easily cut with hot wire. |
Although it's nice and light and easy to work with, Styrofoamź can
be dissolved by petroleum products such as gasoline. Therefore it
cannot be used for fuel tank construction and should be kept away
from areas where fuel might contact it. Also, Styrofoamź cannot
be used with either polyester or vinyl ester resins. It is only
compatible with epoxy resin. Polyurethane foam is used for all the
foam parts of the Marathon and Celerity, unless you decide to cut
some Styrofoamź with a hot wire for use in leading edges, controls,
or to make fuel tank forms.
Caution: you cannot cut polyurethane foam with a hot wire--it will emit
a poisonous gas if you do so.
However, polyurethane foam cuts easily with a knife, and it can be
shaped with light sandpaper, or even with another piece of the foam
used as a sanding block.
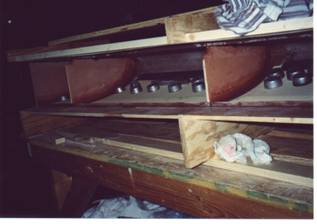
|
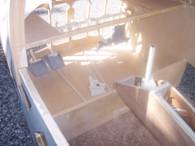
| Two fuel tank baffles covered with epoxy resin and fast hardener. A foam blank is shown at lower right, and glass cloth at top right.
|
Other foam materials that are sometimes used for homebuilt aircraft
construction include Divinycellź and Klegecellź. I have not used
either one of these polyvinyl chloride type foams so I cannot comment
on them.
Putting it all together: foam plus fiberglass equals one strong airplane!
If you apply fiberglass to both sides of a polyurethane foam core,
the combination of the two materials increases the strength by a
factor of three, and the stiffness by a factor of seven, with only
a few per cent weight increase.
And if you increase the thickness of the foam core, the increase
in the strength of the completed, fiberglassed piece is almost an
exponential function! (i.e.--double the thickness and you almost
square the strength, with very little weight gain)
We specify 1/4 inch polyurethane foam for the skin on the wing,
vertical and horizontal stabilizer, 1/2 inch polyurethane foam for the
turtle deck and canopy area, and one inch foam for the fuselage sides
and bottom. One inch thick foam is glued directly to the fuselage
plywood, and does not need a layer of fiberglass applied to the inside
surface. However, all the rest of the foam sandwich panels used on the
wings, tail and turtle deck must have one layer of fiberglass applied
to the inside surface and two to three layers applied to the outside.
Applying fiberglass to foam
Before applying resin and glass cloth to the foam, you should seal it
first to prevent it from soaking up too much resin and becoming heavy.
Mix up the resin and hardener, and then add an approximately equal
volume of microballoons to make a slurry seal. Apply this slurry over
the entire surface of the foam panel before applying the glass cloth.
The microballoons will help prevent the foam from soaking up the
resin and will keep your structure strong and lightweight. I like
to apply the slurry with a rubber or plastic squeegee, as it helps
push the slurry down into the foam a bit. Do not let the slurry dry
before applying fiberglass. Apply the first layer of glass cloth
right over the wet slurry and squeegee it lightly from the center
outward to help embed the fibers in the slurry. Try to run the
squeegee along the directions of the fibers so you dont pull the
glass cloth out of shape and disturb the orientation of the fibers.
Fiberglass cloth is laid with its strands running at a 45 degree
angle to the longitudinal axis of the piece, for two reasons: it
provides more strength in the desired direction, and the cloth will
follow the curves (such as a leading edge or wing root) much better.
Now apply the straight resin and hardener mixture (no microballons)
to the glass cloth. Use a squeegee to pick up excess resin and return
it to your cup. Whitish appearing areas are resin starved--apply a
little more resin to these areas.
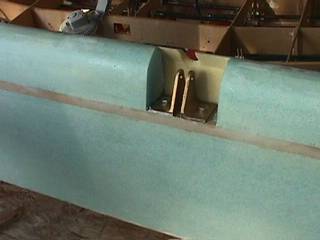
|
| The inside of a fiberglass, leading edge fuel tank, turned upside down. Polyurethane foam panels are weighted down with lead and will be covered with fiberglass to add stiffness to the fuel tank wall. The baffles (i.e. ribs) are epoxied in place. |
Sometimes you have to force the resin down into the cloth to thoroughly
saturate it and get rid of the whitish cast. Stabbing motions with a
resin wetted paint brush (called "stippling") will work very nicely,
although sometimes a squeegee will do. Do not worry about making a
smooth finish when you are fiberglassing. If you try to do that,
you will apply too much heavy resin, which will add weight but
not strength to your airplane. Just work fast, remove the excess,
and get it done. Later on you will apply filler and sand it down
to the glassy, perfectly smooth skin that catches the eyes of the
judges at Oshkosh. If you find that you're not working fast enough
to prevent the resin from reacting in your mixing cup, you can delay
the onset of the reaction by keeping the resin cool. This is most
easily accomplished by using a wide mixing cup that presents a lot of
surface area to the atmosphere for cooling, and by only mixing up a
small portion of the resin and hardener at a time. West System 105
resin and 206 hardener gives you a pot life of 20 to 25 minutes at
room temperature. However, according to the directions this mixture
must be applied at an ambient temperature of at least 60F, or 15.5C.
The faster hardener (No. 205) can be applied at cooler temperatures,
as low as 40F, or 4.5C, but its pot life is approximately half that
of 206 hardener. If it's hot (warmer than 72F) you might want to set
your glue pot in a shallow pan of cool water to delay the reaction
of the resin and hardener.
|
| This aileron has been fiberglassed. At this point I am making covers for the hinge access cutouts. As you can see, I used the slow (clear) hardener here. |
Overlap adjacent pieces of glass cloth by at least an inch, and
put dacron peel ply tape on the overlap to smooth it out. Also use
peel ply in corners where strips of reinforcing cloth will be applied
later on. Remove the peel ply the next day. If you can, it's best to
completely finish a fiberglass layup in one work session rather than
coming back to apply another layer later on. As it sets up the resin
exudes a sort of waxy type material that must be thoroughly removed
from the surface before applying more fiberglass. Scuff each layer
with medium grit sandpaper and clean it with acetone or MEK before
applying any additional resin or cloth. Just be careful that you
don't sand down into the glass cloth fibers, as it will compromise
the strength of the material.
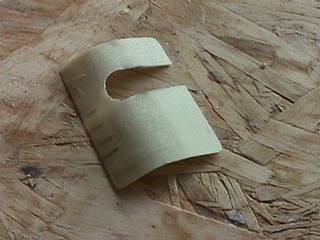
|
| This cover for the aileron hinge access hole is made from the material that was carefully cut out of the slot. Some foam remains on the inside of the piece. It will be screwed to small wood blocks epoxied at either end of the open slot. |
This is an admittedly quick look at composite construction. It's fun,
and also gratifying when you see the results. With a little more
knowledge you're ready to go out there and try it yourself!
More help is available
Our Celerity and Marathon Builder's Manuals include more detailed
instructions on composite construction for the new builder,
and Construction Video No. 2 includes a segment on fiberglassing.
This demonstration was by someone who was not experienced, so you can
see how another first-timer handled it. We have produced a video,
"Easy Fiberglassing", which is Number 6 in our Celerity/Marathon
construction video series. This one emphasizes fuel tank construction
for the new builder. Also, if you are a beginner, I highly recommend
the EAA video, "Basic Composite Construction", and in about 35 minutes
you will learn more about fiberglassing than just about anywhere else
in the world!
|
Fiberglass may also be applied directly to plywood

Updates from the field
Mike Toft reports that he may be able to fly his Celerity with its
unique Cadillac Northstar engine in the next year. I sincerely
hope so, as the interest in auto engine conversions is intense,
and his chain drive PSRU will generate a lot of interest on
its own.
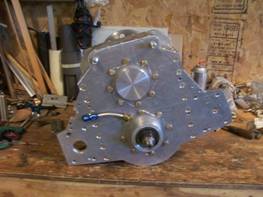
| | Mike Toft's chain drive PSRU for Northstar engine |
Cyril McLavin reports the following regarding the engine proposed for
the Celerity he is building: "Hi Eldon, Delta Hawk .com is my engine
of choice approx 160 hp 4.5 gals/hr cruise no mags cam etc. turbo and
supercharger so no glow plugs and 20k. + altitude with full power price
is about $20k. Runs on jet A or auto diesel and mixable. Hope to hear
from you soon. Cyril"
Tom Allison wrote concerning his Celerity project he bought from
Bob Bowers while at the Copperstate EAA fly-in a few years ago.
"Dear Eldon, Here's a photo of the plane, you can see how far along I am.
Tail feathers are done and closed out. Hooking up the left aileron and
the controls will be finished. Hope to fly soon and also out that way
to the fly-in. If you get a chance call Bob Bowers and let him know.
I'll be calling you soon. Tom"
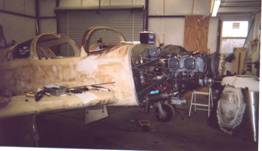
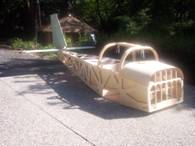
| | Tom Allison's Celerity with Lycoming engine installed. Note completed cowling at right, standing on the shop floor. |
For Sale--Gary Briley's project!
All materials included to finish except 6mm ply for wing ribs.
Incl. foam, fiberglass, all hardware, tubing, etc., hinges,
brackets complete and most are painted/powder coated.
Com antenna and IFR antenna built into vert. stab. and
horiz. stab. incl. cables to reach inst. panel. I have some
electric wire also, three trim servos are included and wiring.
Incl. center stick control! Will sell everything incl. 3 X 16
table and all my special tools, spare parts, plans and videos for
$5,500.00 FOB Paradise, CA. I have spent $10,373.00 to date.
Someone will get a real bargain! If I hear nothing from the
group, Ebay is next. Gary Briley, 6637 Creekside Dr., Paradise,
CA 95969 (530) 872-8892 or email at glb_31@pacbell.net. (Wood
is Port Orford cedar -- ed.)
© 2007, Mirage Aircraft, Inc, Tuscon, AZ
|